Some time ago I decided that I wanted to track some weather data like temperature, humidity and CO2 in my apartment. The data should be imported into a InfluxDB so that I can use Grafana in order to create diagrams based on this data. After looking over the pre-built options I decided to just built the sensor from scratch with a ESP8266 and a couple of sensors.
What is needed?
- ESP8266
I decided to use a NodeMCU as it comes with a USB port that has a serial programmer directly embedded. - DHT21 (AM2301) Temperature + Humidity Sensor
This sensor is used to track the temperature and the humidity in the room. - SGP30 CO2 Sensor
This sensor is used to calculate the CO2 and TVOC level in the room.
Preparation
SGP 30
The first thing to do is to solder the header pins onto the SGP30. Once that is done the first thing to do is to connect the SGP30 to the ESP8266 and use the test programm from Adafruit in order to calibrate the co2 sensor by calculating the baseline. I used the following pins for the connection:
| SGP 30 Pin | ESP8266 Pin |
|---|---|
| VIN | 3V |
| GND | GND |
| SCL | D1 |
| SDA | D2 |
There are two options to do the calibration:
- Use the Arduino IDE to install the sgp30test library, run it and then use the serial monitor to get the right data out. This is described in the article from Adafruit.
- Download the example from the SGP30 Github and use your preferred tooling to upload it to the ESP8266.
As I will use PlatformIO for the code anyways I will show the second option.
PlatformIO
An installation guide for PlatformIO can be found on their page. I will use visual studio code so it basically comes down to installing the PlatformIO extension from the visual studio code store.
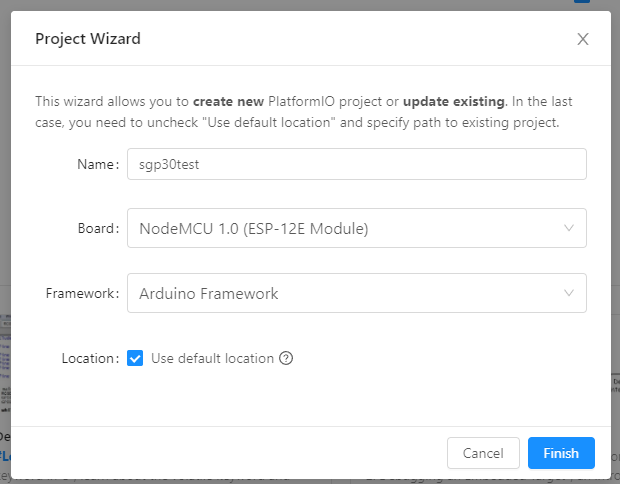
The first thing is to create a new Project in PlatformIO with the following settings:

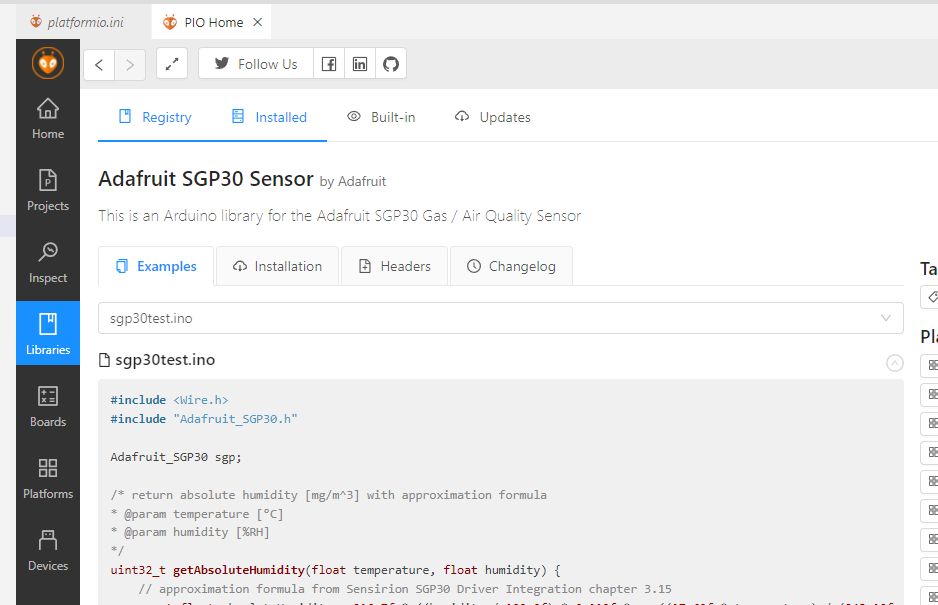
The next step is to add the Adafruit SGP30 library from the Library Page:

You will directly find the sgp30test example in the library page so you can copy it from there (if not get it from the github link above) and replace the src/main.cpp with the sgp30test example. Then you can connect your NodeMCU to your computer and flash the software by using the “PlatformIO: Upload icon” in the bottom bar of visual studio code  .
.
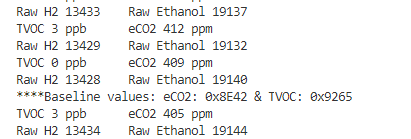
Before you can then use the Serial Monitor you need to adjust the Serial Monitor Speed to 115200 baud. That can be done by adding monitor_speed = 115200 to the platformio.ini inside the project. Afterwards you can click on the “PlatformIO: Serial Monitor” icon and should be able to see data flooding in:

Now you just need to open a window and wait for 10-15 minutes while the baseline gets calibrates. After this time note down the baseline values that get printed (in the screenshot they are 0x8E42 and 0x9265).
DHT21
The DHT21 does not need any solder and can directly be connected to the NodeMCU. I used the following pins:
| DHT21 Pin | ESP8266 Pin |
|---|---|
| VDD | 3V |
| Data | D6 |
| GND | GND |
MQTT
To push the data from the NodeMCU into InfluxDB I decided to use MQTT as I can attach Telegraf to MQTT and also use MQTT to display the data on other devices. In order to publish data to MQTT a MQTT broker like Eclipse Mosquitto is needed. As I use Docker for all my self-hosting needs I used the following docker-compose.yml to create a instance of Eclipse Mosquitto on my server:
version: "3"

services:
  mosquitto:
    image: eclipse-mosquitto:latest
    container_name: mosquitto
    volumes:
      - $PWD/config:/mosquitto/config
      - mosquitto-data:/mosquitto/data
    ports:
      - 1883:1883
    restart: always

volumes:
    mosquitto-config:
    mosquitto-data:
By default mosquitto does not use authentication. To fix this add password_file /mosquitto/config/password_file to config/mosquitto.conf inside the folder where the docker file is defined. You can then add users with docker exec -it mosquitto mosquitto_passwd /mosquitto/config/password_file <username>.
Flashing
Now that everything is set up you can get the code from the repository. A couple of things need to be changed.
- There is a cred.h.template in the include folder.
This file contains secrets like the wifi password for the ESP8266 and the credentials for the MQTT broker.
Rename the file to cred.h and enter the values for your wifi and MQTT broker. - The setup method of the src/main.cpp contains a call to sgp.setIAQBaseline. The arguments are the baseline values that you gathered from the sgp30test util in the preparation.
- If you want to check the topic names for the data in MQTT you need to change the second argument of the Adafruit_MQTT_Publish objects on top of src/main.cpp.
Afterwards you can flash the code on the ESP8266. You can use the serial monitor to check if the ESP can correctly connect to your wifi and mqtt broker.
InfluxDB
The MQTT data can easily be imported into InfluxDB by using Telegraf and using the mqtt_consumer input plugin.
[[inputs.mqtt_consumer]]
  servers = ["tcp://broker_url:1883"]

  topics = [
    "weather/aucubin/temp",
    "weather/aucubin/humidity",
    "weather/aucubin/tvoc",
    "weather/aucubin/eco2"
  ]

  client_id = "client_name"

  username = "username"
  password = "password"

  data_format = "value"
  data_type = "float"